ElasticSearch必备知识:从索引别名、分词器、文档管理、路由到搜索详解(下)
三、文档管理
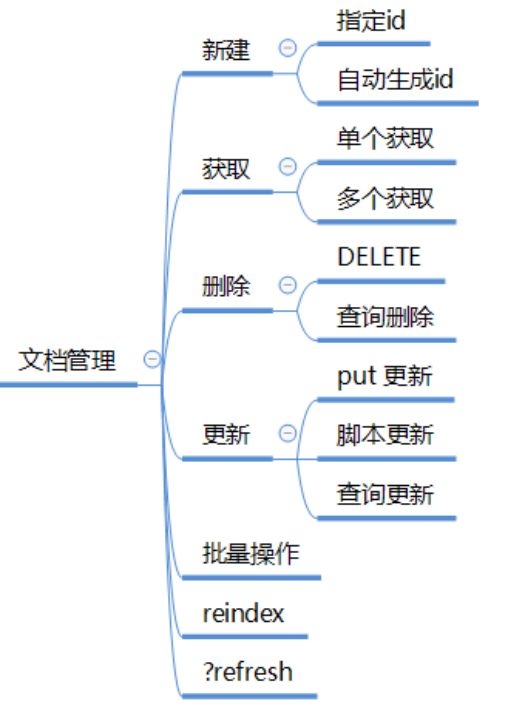
1. 新建文档
指定文档id,新增/修改
PUT twitter/_doc/1
{
"id": 1,
"user" : "kimchy",
"post_date" : "2009-11-15T14:12:12",
"message" : "trying out Elasticsearch"
}
新增,自动生成文档id
POST twitter/_doc/
{
"id": 1,
"user" : "kimchy",
"post_date" : "2009-11-15T14:12:12",
"message" : "trying out Elasticsearch"
}
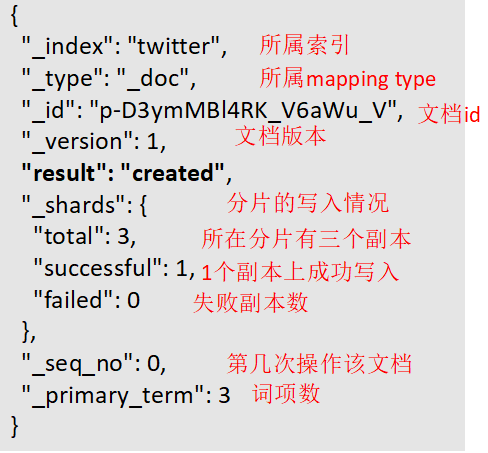
返回结果说明:
2. 获取单个文档
HEAD twitter/_doc/11
GET twitter/_doc/1
不获取文档的source:
GET twitter/_doc/1?_source=false
获取文档的source:
GET twitter/_doc/1/_source
{
"_index": "twitter",
"_type": "_doc",
"_id": "1",
"_version": 2,
"found": true,
"_source": {
"id": 1,
"user": "kimchy",
"post_date": "2009-11-15T14:12:12",
"message": "trying out Elasticsearch"
}}
获取存储字段
PUT twitter11
{
"mappings": {
"_doc": {
"properties": {
"counter": {
"type": "integer",
"store": false
},
"tags": {
"type": "keyword",
"store": true
} } } }}
PUT twitter11/_doc/1
{
"counter" : 1,
"tags" : ["red"]
}
GET twitter11/_doc/1?stored_fields=tags,counter
3. 获取多个文档 _mget
方式1:
GET /_mget{
"docs" : [
{
"_index" : "twitter",
"_type" : "_doc",
"_id" : "1"
},
{
"_index" : "twitter",
"_type" : "_doc",
"_id" : "2"
"stored_fields" : ["field3", "field4"]
}
]
}
方式2:
GET /twitter/_mget
{
"docs" : [
{
"_type" : "_doc",
"_id" : "1"
},
{
"_type" : "_doc",
"_id" : "2"
}
]
}
方式3:
GET /twitter/_doc/_mget
{
"docs" : [
{
"_id" : "1"
},
{
"_id" : "2"
}
]
}
GET /twitter/_doc/_mget
{
"ids" : ["1", "2"]
}
4. 删除文档
指定文档id进行删除
DELETE twitter/_doc/1
用版本来控制删除
DELETE twitter/_doc/1?version=1
返回结果:
{
"_shards" : {
"total" : 2,
"failed" : 0,
"successful" : 2
},
"_index" : "twitter",
"_type" : "_doc",
"_id" : "1",
"_version" : 2,
"_primary_term": 1,
"_seq_no": 5,
"result": "deleted"
}
查询删除
POST twitter/_delete_by_query
{
"query": {
"match": {
"message": "some message"
}
}
}
当有文档有版本冲突时,不放弃删除操作(记录冲突的文档,继续删除其他复合查询的文档)
POST twitter/_doc/_delete_by_query?conflicts=proceed
{
"query": {
"match_all": {}
}
}
通过task api 来查看 查询删除任务
GET _tasks?detailed=true&actions=*/delete/byquery
查询具体任务的状态
GET /_tasks/taskId:1
取消任务
POST _tasks/task_id:1/_cancel
5. 更新文档
指定文档id进行修改
PUT twitter/_doc/1
{
"id": 1,
"user" : "kimchy",
"post_date" : "2009-11-15T14:12:12",
"message" : "trying out Elasticsearch"
}
乐观锁并发更新控制
PUT twitter/_doc/1?version=1
{
"id": 1,
"user" : "kimchy",
"post_date" : "2009-11-15T14:12:12",
"message" : "trying out Elasticsearch"
}
返回结果
{
"_index": "twitter",
"_type": "_doc",
"_id": "1",
"_version": 3,
"result": "updated",
"_shards": {
"total": 3,
"successful": 1,
"failed": 0
},
"_seq_no": 2,
"_primary_term": 3
}
6. Scripted update 通过脚本来更新文档
6.1 准备一个文档
PUT uptest/_doc/1
{
"counter" : 1,
"tags" : ["red"]
}
6.2 对文档1的counter + 4
POST uptest/_doc/1/_update
{
"script" : {
"source": "ctx._source.counter += params.count",
"lang": "painless",
"params" : {
"count" : 4
}
}
}
6.3 往数组中加入元素
POST uptest/_doc/1/_update
{
"script" : {
"source": "ctx._source.tags.add(params.tag)",
"lang": "painless",
"params" : {
"tag" : "blue"
}
}
}
脚本说明:painless是es内置的一种脚本语言,ctx执行上下文对象(通过它还可访问_index, _type, _id, _version, _routing and _now (the current timestamp) ),params是参数集合
说明:脚本更新要求索引的_source 字段是启用的。更新执行流程:
a、获取到原文档
b、通过_source字段的原始数据,执行脚本修改。
c、删除原索引文档d、索引修改后的文档
6.4 添加一个字段
POST uptest/_doc/1/_update
{
"script" : "ctx._source.new_field = 'value_of_new_field'"
}
6.5 移除一个字段
POST uptest/_doc/1/_update
{
"script" : "ctx._source.remove('new_field')"
}
6.6 判断删除或不做什么
POST uptest/_doc/1/_update
{
"script" : {
"source": "if (ctx._source.tags.contains(params.tag)) { ctx.op = 'delete' } else { ctx.op = 'none' }",
"lang": "painless",
"params" : {
"tag" : "green"
}
}
}
6.7 合并传人的文档字段进行更新
POST uptest/_doc/1/_update
{
"doc" : {
"name" : "new_name"
}}
6.8 再次执行7,更新内容相同,不需做什么
{
"_index": "uptest",
"_type": "_doc",
"_id": "1",
"_version": 4,
"result": "noop",
"_shards": {
"total": 0,
"successful": 0,
"failed": 0
}
}
6.9 设置不做noop检测
POST uptest/_doc/1/_update
{
"doc" : {
"name" : "new_name"
},
"detect_noop": false
}
什么是noop检测?
即已经执行过的脚本不再执行
6.10 upsert 操作:如果要更新的文档存在,则执行脚本进行更新,如不存在,则把 upsert中的内容作为一个新文档写入。
POST uptest/_doc/1/_update{
"script" : {
"source": "ctx._source.counter += params.count",
"lang": "painless",
"params" : {
"count" : 4
}
},
"upsert" : {
"counter" : 1
}
}
7. 通过条件查询来更新文档
满足查询条件的才更新
POST twitter/_update_by_query
{
"script": {
"source": "ctx._source.likes++",
"lang": "painless"
},
"query": {
"term": {
"user": "kimchy"
}
}
}
8. 批量操作
批量操作API /_bulk 让我们可以在一次调用中执行多个索引、删除操作。这可以大大提高索引数据的速度。批量操作内容体需按如下以新行分割的json结构格式给出:
语法:
action_and_meta_data\n
optional_source\n
action_and_meta_data\n
optional_source\n
....
action_and_meta_data\n
optional_source\n
说明:
action_and_meta_data: action可以是 index, create, delete and update ,meta_data 指: _index ,_type,_id 请求端点可以是: /_bulk, /{index}/_bulk, {index}/{type}/_bulk
示例:
POST _bulk
{ "index" : { "_index" : "test", "_type" : "_doc", "_id" : "1" } }
{ "field1" : "value1" }
{ "delete" : { "_index" : "test", "_type" : "_doc", "_id" : "2" } }
{ "create" : { "_index" : "test", "_type" : "_doc", "_id" : "3" } }
{ "field1" : "value3" }
{ "update" : {"_id" : "1", "_type" : "_doc", "_index" : "test"} }
{ "doc" : {"field2" : "value2"} }
8.1 curl + json 文件 批量索引多个文档
注意:accounts.json要放在执行curl命令的同等级目录下,后续学习的测试数据基本都使用这份银行的数据了
curl -H "Content-Type: application/json" -XPOST "localhost:9200/bank/_doc/_bulk?pretty&refresh" --data-binary "@accounts.json"
9. reindex 重索引
Reindex API /_reindex 让我们可以将一个索引中的数据重索引到另一个索引中(拷贝),要求源索引的_source 是开启的。目标索引的setting 、mapping 信息与源索引无关。
什么时候需要重索引?
即当需要做数据的拷贝的时候
POST _reindex
{
"source": {
"index": "twitter"
},
"dest": {
"index": "new_twitter"
}
}
重索引要考虑的一个问题:目标索引中存在源索引中的数据,这些数据的version如何处理。
1. 如果没有指定version_type 或指定为 internal,则会是采用目标索引中的版本,重索引过程中,执行的就是新增、更新操作。
POST _reindex
{
"source": {
"index": "twitter"
},
"dest": {
"index": "new_twitter",
"version_type": "internal"
}
2. 如果想使用源索引中的版本来进行版本控制更新,则设置 version_type 为extenal。重索引操作将写入不存在的,更新旧版本的数据。
POST _reindex
{
"source": {
"index": "twitter"
},
"dest": {
"index": "new_twitter",
"version_type": "external"
}
}
如果你只想从源索引中复制目标索引中不存在的文档数据,可以指定 op_type 为 create 。此时存在的文档将触发 版本冲突(会导致放弃操作),可设置“conflicts”: “proceed“,跳过继续
POST _reindex
{
"conflicts": "proceed",
"source": {
"index": "twitter"
},
"dest": {
"index": "new_twitter",
"op_type": "create"
}
}
你也可以只索引源索引的一部分数据,通过 type 或 查询来指定你需要的数据
POST _reindex
{
"source": {
"index": "twitter",
"type": "_doc",
"query": {
"term": {
"user": "kimchy"
}
}
},
"dest": {
"index": "new_twitter"
}
}
可以从多个源获取数据
POST _reindex
{
"source": {
"index": ["twitter", "blog"],
"type": ["_doc", "post"]
},
"dest": {
"index": "all_together"
}
}
可以限定文档数量
POST _reindex
{
"size": 10000,
"source": {
"index": "twitter",
"sort": { "date": "desc" }
},
"dest": {
"index": "new_twitter"
}
}
可以选择复制源文档的哪些字段
POST _reindex
{
"source": {
"index": "twitter",
"_source": ["user", "_doc"]
},
"dest": {
"index": "new_twitter"
}
}
可以用script来改变文档
POST _reindex
{
"source": {
"index": "twitter"
},
"dest": {
"index": "new_twitter",
"version_type": "external"
},
"script": {
"source": "if (ctx._source.foo == 'bar') {ctx._version++; ctx._source.remove('foo')}",
"lang": "painless"
}
}
可以指定路由值把文档放到哪个分片上
POST _reindex
{
"source": {
"index": "source",
"query": {
"match": {
"company": "cat"
}
}
},
"dest": {
"index": "dest",
"routing": "=cat"
}
}
从远程源复制
POST _reindex
{
"source": {
"remote": {
"host": "http://otherhost:9200",
"username": "user",
"password": "pass"
},
"index": "source",
"query": {
"match": {
"test": "data"
}
}
},
"dest": {
"index": "dest"
}
}
通过_task 来查询执行状态
GET _tasks?detailed=true&actions=*reindex
10. refresh
对于索引、更新、删除操作如果想操作完后立马重刷新可见,可带上refresh参数
PUT /test/_doc/1?refresh
{"test": "test"}
PUT /test/_doc/2?refresh=true
{"test": "test"}
refresh 可选值说明
未给值或=true,则立马会重刷新读索引。
=false ,相当于没带refresh 参数,遵循内部的定时刷新。
=wait_for ,登记等待刷新,当登记的请求数达到index.max_refresh_listeners 参数设定的值时(defaults to 1000),将触发重刷新。
四、路由详解

1. 集群组成
第一个节点启动
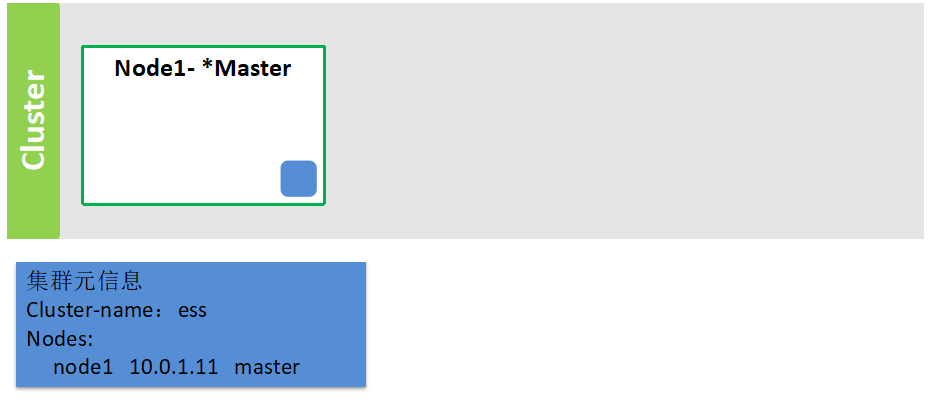
说明:首先启动的一定是主节点,主节点存储的是集群的元数据信息
Node2启动
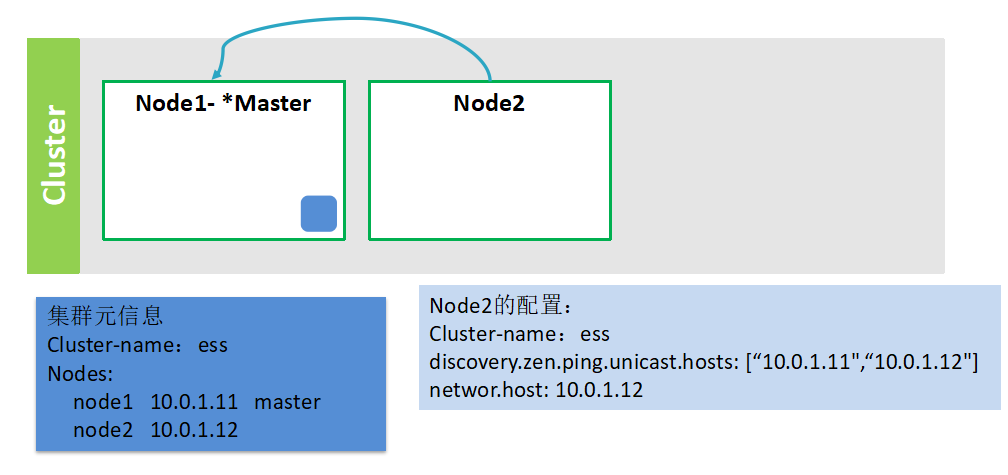
说明:
Node2节点启动之前会配置集群的名称Cluster-name:ess,然后配置可以作为主节点的ip地址信息discovery.zen.ping.unicast.hosts: [“10.0.1.11",“10.0.1.12"],配置自己的ip地址networ.host: 10.0.1.12;
Node2启动的过程中会去找到主节点Node1告诉Node1我要加入到集群里面了,主节点Node1接收到请求以后看Node2是否满足加入集群的条件,如果满足就把node2的ip地址加入的元信息里面,然后广播给集群中的其他节点有
新节点加入,并把最新的元信息发送给其他的节点去更新
Node3..NodeN加入
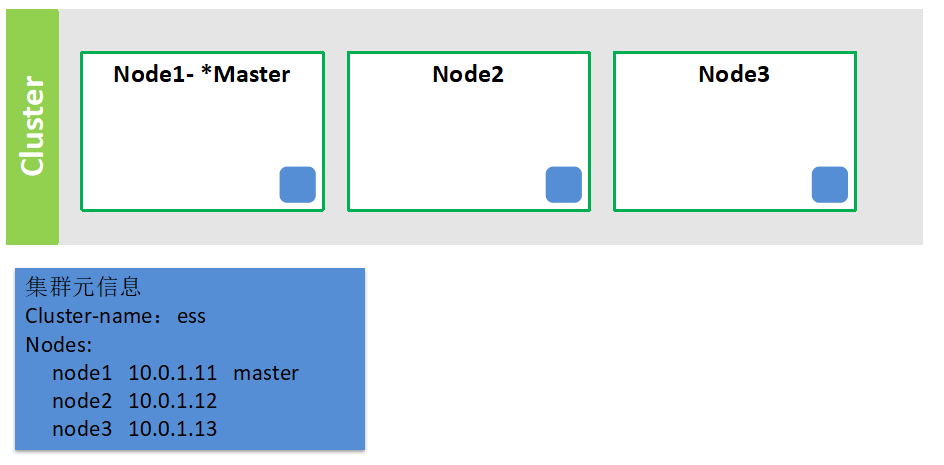
说明:集群中的所有节点的元信息都是和主节点一致的,因为一旦有新的节点加入进来,主节点会通知其他的节点同步元信息
2. 在集群中创建索引的流程
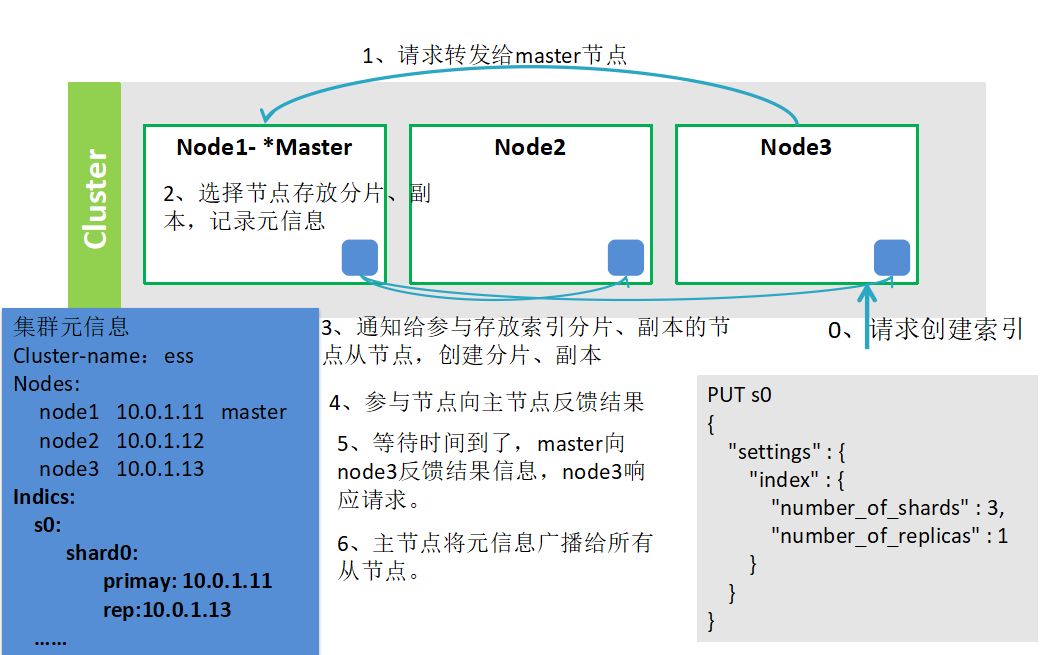
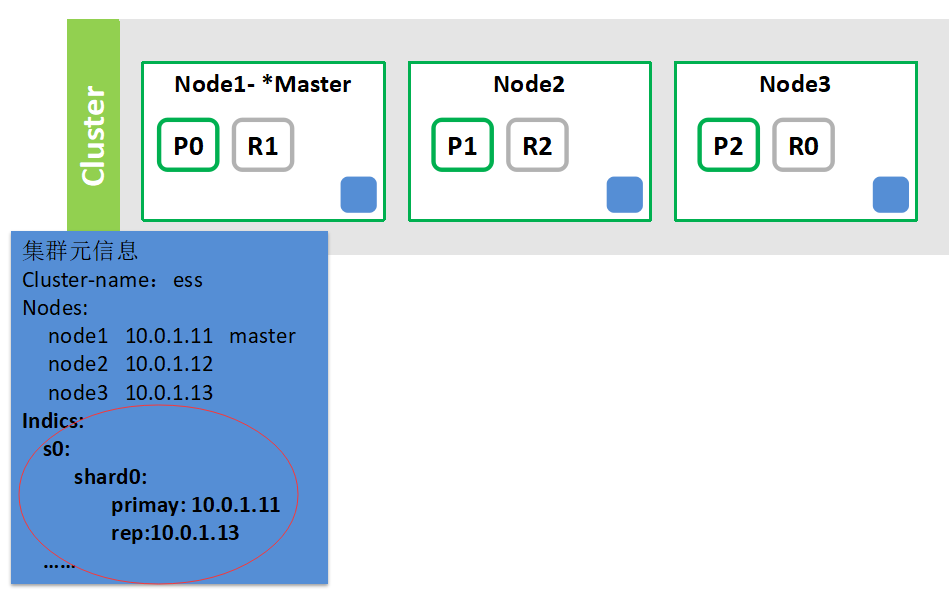
3. 有索引的集群
4. 集群有节点出现故障,如主节点挂了,会重新选择主节点
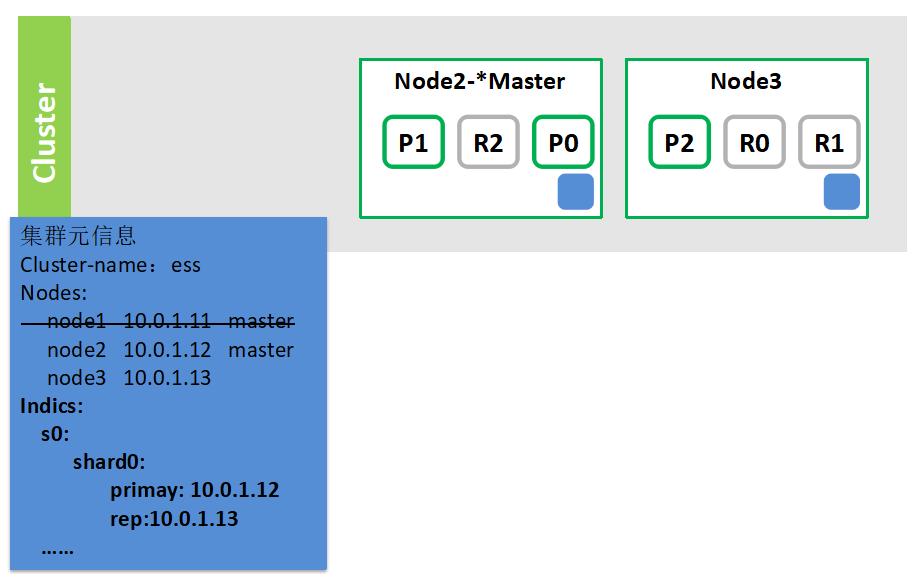
5. 在集群中索引文档
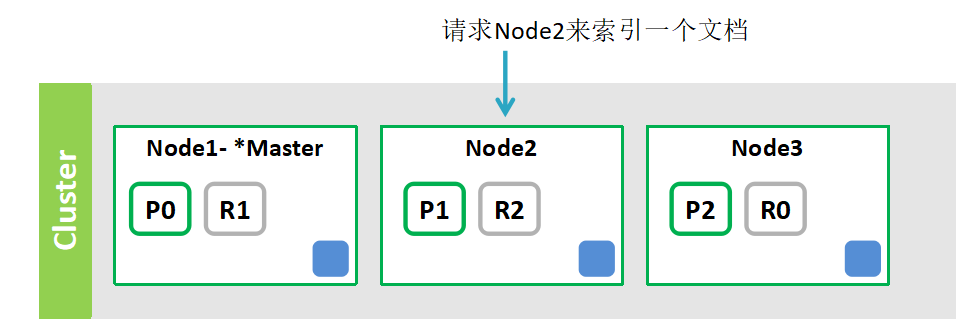
索引文档的步骤:
1. node2计算文档的路由值得到文档存放的分片(假定路由选定的是分片0)。
2. 将文档转发给分片0(P0)的主分片节点 node1。
3. node1索引文档,同步给副本(R0)节点node3索引文档。
4. node1向node2反馈结果
5. node2作出响应
6. 文档是如何路由的
文档该存到哪个分片上?
决定文档存放到哪个分片上就是文档路由。ES中通过下面的计算得到每个文档的存放分片:
shard = hash(routing) % number_of_primary_shards
参数说明:
routing 是用来进行hash计算的路由值,默认是使用文档id值。我们可以在索引文档时通过routing参数指定别的路由值
number_of_primary_shards:创建索引时指定的主分片数
POST twitter/_doc?routing=kimchy
{
"user" : "kimchy",
"post_date" : "2009-11-15T14:12:12",
"message" : "trying out Elasticsearch"
}
在索引、删除、更新、查询中都可以使用routing参数(可多值)指定操作的分片。
创建索引时强制要求给定路由值:
PUT my_index2
{
"mappings": {
"_doc": {
"_routing": {
"required": true
}
}
}
}
7. 在集群中进行搜索
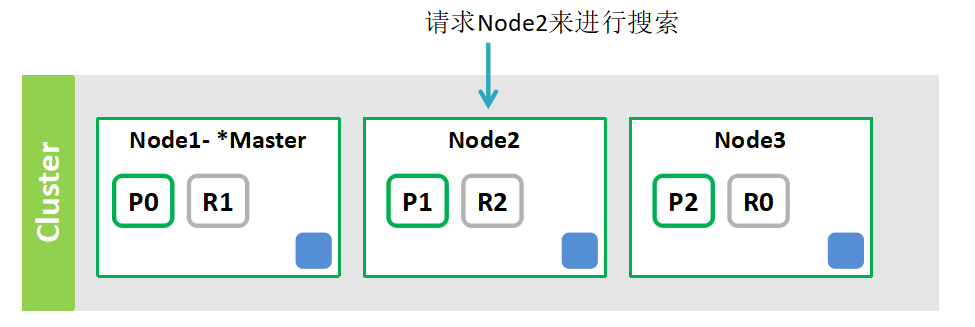
搜索的步骤:如要搜索
索引 s0
1. node2解析查询。
2. node2将查询发给索引s0的分片/副本(R1,R2,R0)节点
3. 各节点执行查询,将结果发给Node2